How to Add Components and Make them Optional
Published on
BitRock InstallBuilder allows you to create cross platform installers that make it easy for end users to install your software. Though users are often presented with a simple 5-click process, the software bundled inside and its configuration are typically very complex and difficult to set up manually. Examples of this are posted on BitNami.org, where stacks like Redmine, Alfresco or KnowledgeTree, which are fairly complex to install manually, can be installed in minutes thanks to installers that automate the process.
All of the applications available via BitNami have many different dependencies, such as: libraries, databases, web servers, programming languages, run-times, etc. Apart from that, each of them has to be configured a certain way and then all of the pieces need to be integrated to work together. The installation process gets even more complicated if you want to make those 'modules' optional and allow the end user choose which ones should be installed and how they should be configured. BitRock InstallBuilder's components make the task easier.
What is a Component?
You can think of a component as a 'black box' you use to simplify the way you build the installer. It is kind of a partial installer inside the primary installer that only applies to a subset of the software you are packaging (such as Apache, MySQL, etc). This makes it very easy to re-use pieces of your installer and add and remove them as necessary. You can bundle files within components and add rules, scripts, actions, variables or parameter pages (which are used to ask the user how they want to configure that piece of software). Various components are then bundled inside the primary installer to present end users with a complete package. If you are familiar with DRY (Do not Repeat Yourself) or KISS (Keep It Simple Stupid) terms, then InstallBuilder components will surely make you happy.
How to Add Components
The InstallBuilder demo project comes with a default component. It is important to understand that BitRock InstallBuilder is very component-oriented - even when you create a very simple installer, you will probably have at least one component.
Once you have InstallBuilder running in the GUI mode, go to 'Files' or the 'Advanced' section. All available components are displayed there. There are two ways to add a new one:
- From the 'Files' section: click 'New Component'
- From the 'Advanced' section: select 'Components' and click 'add'
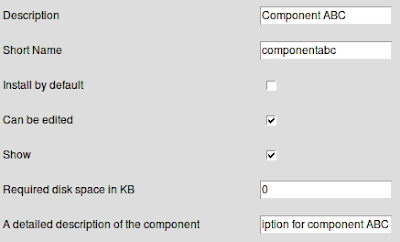
The window shown below should be on your screen.
Here, you specify the three primary options:
'Install by default': The component will be selected by default.
'Can be edited': The end user is able to select or deselect the component in the Component Selection Window.
'Show': The component will be shown in the Component Selection Window.
You can do the same by editing the 'project.xml' file and adding the following snippet of XML:
```
<componentList> … <component> <name>componentabc</name> <description>Component ABC</description> <canBeEdited>1</canBeEdited> <detailedDescription>simple description for the component ABC</detailedDescription> <selected>0</selected> <shouldPackRuleEvaluationLogic>or</shouldPackRuleEvaluationLogic> <show>1</show> </component> … </componentList>
```
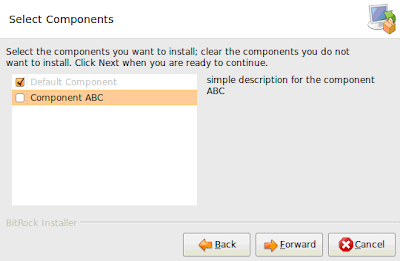
People usually associate installer components with a window where the user can select or deselect software to be installed on their machine. This window is not shown by default in the case of InstallBuilder. Very often, you use components to make your installers well organized, clean and your XML code easier to reuse. If you want to show this window during installation, go to the 'Advanced' section, select 'project', click 'More', select 'Installation' in a new window and then 'Allow Component Selection'..
You can do the same by editing your xml file:
<allowComponentSelection>1</allowComponentSelection>
and during installation the following window will be displayed:
Summary
As we have mentioned at the beginning of this post, components are like sub-installers. Inside them, you can bundle part of your application files, configuration, scripts, etc. Try to design your components in such a way that they can be reused in the future. Almost all InstallBuilder functionality, such as parameter pages, action lists, and rule lists are available for components:
Additionally, you can place your components inside separate files and then include them in the main file:
```
<componentList> … <include file="component_abc.xml"/> … </componentList>
```
… but it is a topic for another article.
You can find more information about components in our online knowledge base. Here are a few articles that may be of interest:
- http://support.bitrock.com/article/how-do-components-work-in-installbuilder
- http://support.bitrock.com/article/does-installbuilder-support-component-selection
- http://support.bitrock.com/article/is-there-a-command-line-option-for-component-selection
- http://support.bitrock.com/article/what-are-the-components-of-a-rulelist
We have also made a video demonstrating this procedure:


